
After creating an AVD image, session hosts can be deployed in a host pool using the image.
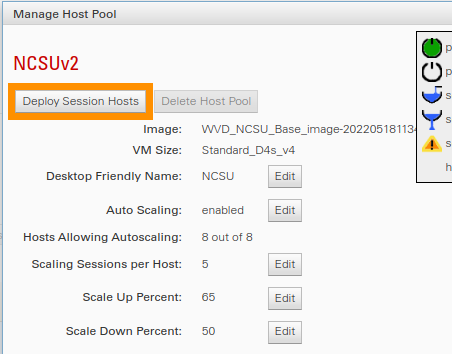
- On the VCL site, go to Manage->Manage AVD->Manage AVD Host Pools
- Click Manage for the Host Pool in which to deploy session hosts
- In the top left of the dialog box, click on Deploy Session Hosts
- Fill in the form fields in the dialog box that opens
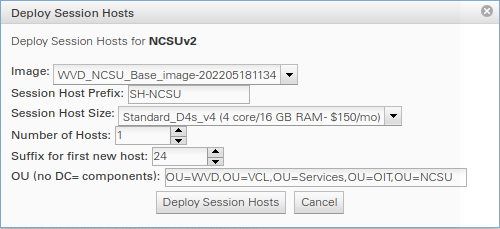
- Image: Select the image to use when deploying the new session hosts. If all of the current session hosts are using the same image, this will default to the one currently being used.
- Session Host Prefix: The name of each new session host will be this plus a number added to the end, with a dash (-) between the prefix and the number. If there are existing session hosts, this will default to a value derived from the current hosts. The typical convention is SH-<College or Dept>, example: SH-PCOM
- Session Host Size: Select the size of each VM that will be deployed. The typical size is D4s_v# (where # represents the current Azure hardware revision), which has 4 cores and 16 GB of RAM.
- Number of Hosts: This is the number of hosts to deploy in this batch.
- Suffix for first new host: This is the suffix added to the end of Session Host Prefix. If there are existing session hosts, this will default to the next number after the current hosts. For example, if the current hosts are SH-PCOM-6, SH-PCOM-7, and SH-PCOM-8, this would default to 9. If you have replaced your session hosts a few times, it may be a good idea to start over and set this back to 1.
- OU: This is the OU where the deployed session hosts should be joined in WolfTech. Do not include the DC= portions of the OU. Example: OU=AVD,OU=VCL,OU=Services,OU=OIT,OU=NCSU.
- Double check the values you entered and click Deploy Session Hosts, this will initiate a call to Azure to deploy session hosts. Please be patient after clicking the Deploy button as the call to Azure typically takes a little over one minute to respond.
- If the call to Azure is successful, a green box will appear at the top of the main Administer AVD screen saying it was successful, and the View Jobs table will open and display the newly submitted job. (The note in the green bar is just informational that the deploy started. It will not go away on its own when the hosts finish deploying.)

If the Azure job to deploy the session hosts completes successfully (which typically takes 10-20 minutes), the session hosts will be added to the host pool with autoscaling disabled. However, the session hosts will be accepting new sessions. It is best to keep an eye on the job, and once it completes, Manage the host pool and disable new sessions on the new session hosts so that they can each be rebooted to pick up Group Policies faster. It is a good idea to give them 5-10 minutes running before doing the reboot to allow the AVD agent installed on each session host a chance to update to the latest version (this is done automatically). - Once you have given each session host an initial reboot, it’s good to let them run for a while for Group Policies to finish applying (longer if you are using SCCM to automatically push software to them). Then, you can power some of them off and enable autoscaling for each of them.
- If you are deploying these session hosts with a new image to replace older session hosts, follow these steps:
- Disable sessions on the old hosts and ensure at least one new host is allowing new sessions
- Verify that you can connect to the host pool through the web client
- Disable autoscaling for the old session hosts
- Remove any old session hosts that don’t have any sessions on them
- Keep an eye on any old session hosts with sessions on them. Once the sessions have cleared up, you can remove those as well.
- At this point, you should be left with just the new session hosts.