
5 Types of Network Storage in AVD
- User profile volume
- NCSU Drive (B: drive)
- Google Drive (typically connected as G: drive)
- Microsoft OneDrive
- Upload/Download via web client
Additional Information
More information about NCSU storage can be found on the storage page. Listed values for quota will be more up to date on that page than this one.
User profile volume
This is the most commonly used space in AVD, though you may not even know it. It typically works well in a “behind the scenes” sort of way. However, when it doesn’t work right, things can get really complicated. For most users, it has 10 GB of quota. Because it is stored in Azure, access to it is really fast.
Your user profile volume can only be connected to one system at a time. When you log in to a device in AVD, your user profile volume gets connected under C:\Users\<username> (i.e. C:\Users\jfthomps). Anything under that location such as My Documents, Download, and Desktop are not actually stored on the C: drive as it looks like. They are instead stored in your user profile volume.
When your session ends, your profile volume gets disconnected. Your session ends either when you log out, or when you have been disconnected from AVD long enough for your session to be automatically closed, which is around an hour. It’s best to specifically log out when you are finished by double clicking on the “Log Off” icon on the desktop rather than just closing your browser window and leaving your session in a disconnected state until it gets timed out. When you need to disconnect briefly for some reason such as moving working locations or changing computers from which you are connecting, it is fine to just close your connection and then reconnect before your session times out.
As mentioned above, your profile disk volume can only be connected to one system at a time. For example, if you logged in to NCSU, disconnected without logging out, and then logged in to NCSU-HeavyApps, your session on NCSU-HeavyApps would not have your profile volume connected to it since your profile volume would still be connected to the disconnected AVD session on NCSU. In those cases, you get a local profile created for you on the system you are connected to. Each “device” in AVD is typically made up of many system. So, you could end up with a local profile on one system in a device (I.e. NCSU) but still get your user profile volume when connected to other systems in the same “device”. We’ve also occasionally seen times where your profile volume just doesn’t get connected, and users get a local profile created instead. To complicate matters further, once you have a local profile on a system, if you ever get connected to that system again, your network user profile volume will not be connected, and you will be using your local profile again..
You can see if your network profile volume was attached correctly by typing “powershell” in the search bar at the bottom of the screen, and pressing Enter to open a “Windows PowerShell” window. Once the PowerShell window opens, paste the following command and press Enter (the character between “Volume” and “Format” is the pipe character, and is typed using Shift-\ ):
Get-WmiObject Win32_Volume | Format-Table Label
If you see “Profile-<username>” (where <username> is your Unity ID, i.e. Profile-jfthomps) in the output, you will know your profile volume is correctly attached. If you don’t see it, you have a local profile volume, and won’t see work you’ve previously saved in places like Documents or Desktop.
Post Semester Clean-up
After the end of the fall and spring semesters, AVD user profile volumes are deleted, and new ones are created for each user when they next log in to AVD. They are typically deleted sometime during the week after exams, This is done to reduce the cost of resources in Azure. Ensure that you copy any needed files off of your AVD user profile volume at the end of each semester to somewhere like your B: drive or Google Drive.
NCSU Drive (B: drive)
All NCSU users have an NCSU drive. For most users, it has 20 GB of quota. It is a network volume on a storage unit in NCSU data centers. It can be connected to multiple systems at the same time and is connected to most systems you log in to at NCSU (in AVD as well as other places such as campus labs). Because it is in NCSU data centers and AVD resources are in Azure, access to it can be a little slower. Some applications don’t handle it being slower well and won’t work correctly when using files stored directly on your NCSU drive. In those cases, you’ll need to use other storage but can copy work to your NCSU drive when you are finished if you find it a good place for storing your data.
Google Drive
All NCSU users have storage in Google. For students, it has 15 GB of quota. Once you log in to Google Drive in AVD, it typically gets mounted as the G: drive. Because it is in Google data centers and AVD resources are in Azure data centers, access to it from AVD can be a little slower. It does provide an option to work with files locally so that interaction with them will be very fast. However, you need to ensure those files are sync’d to Google before you log out of your session. You can check the status of file synchronization using the icon in the system tray in the bottom right. When files are stored locally, they are typically stored in C:\Users\<username>\AppData\Local\Google\DriveFS, which you may notice is in your user profile volume.
Microsoft OneDrive
Though NCSU has standardized on using Google Drive for cloud storage, users do also get 15 GB of quota in OneDrive. It’s use in AVD is supported by campus IT staff, though use outside of AVD does not have much support by campus IT staff. Because it is in Microsoft data centers and AVD resources are also in Microsoft data centers, access to it is fast.
Upload/Download via Web Client
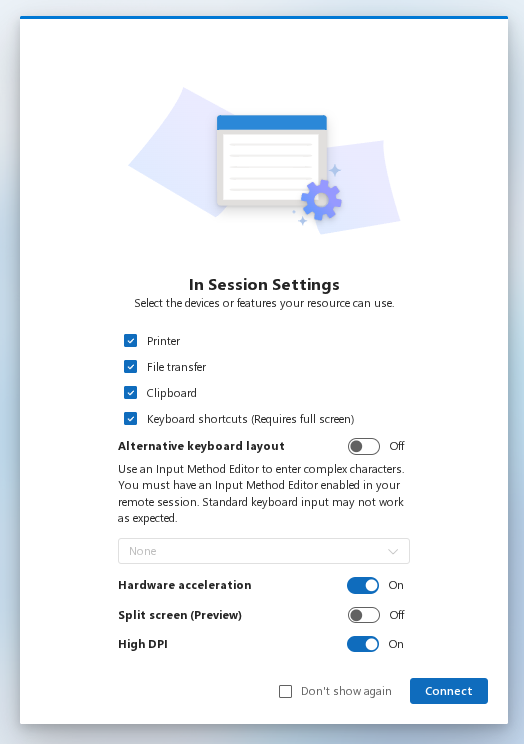
Files can be copies to/from the remote AVD device. This method is a little clunky. For this to be enabled, the File transfer checkbox must be selected in the In Session Settings dialog when logging in to the AVD device.
Once logged in to the remote AVD device, open File Explorer, select This PC, and look for Remote virtual drive on RDWebClient and double click on it.

There will be 2 folders inside it – Downloads and Uploads.
Transfer files from your computer to the AVD device (Upload)
To transfer a file from your computer to the AVD device (upload a file), click the Upload new file icon (cloud with up and down arrows) in the row of icons at the top right of the window and then click Upload.

Once the file is transferred, it will show up under the Uploads folder in File Explorer.
Transfer files from the AVD device to your computer (Download)
To transfer a file from the AVD device to your computer, copy the file to the Downloads folder. This will cause a popup to be displayed in the top right of the remote screen asking if you want to download the file(s). Click Yes to allow the file to be downloaded to your computer. Your browser will download the file as a typical file download. Checking the Don’t ask me again box will cause files copied to the remote system’s Downloads folder to be automatically downloaded by your browser without asking for confirmation.
