VCL go is an iOS app that allows a user to easily create and initiate connections to VCL reservations. The app does not directly connect to the reservation, but it can launch 3rd party applications for connecting to them.
Setup
URL
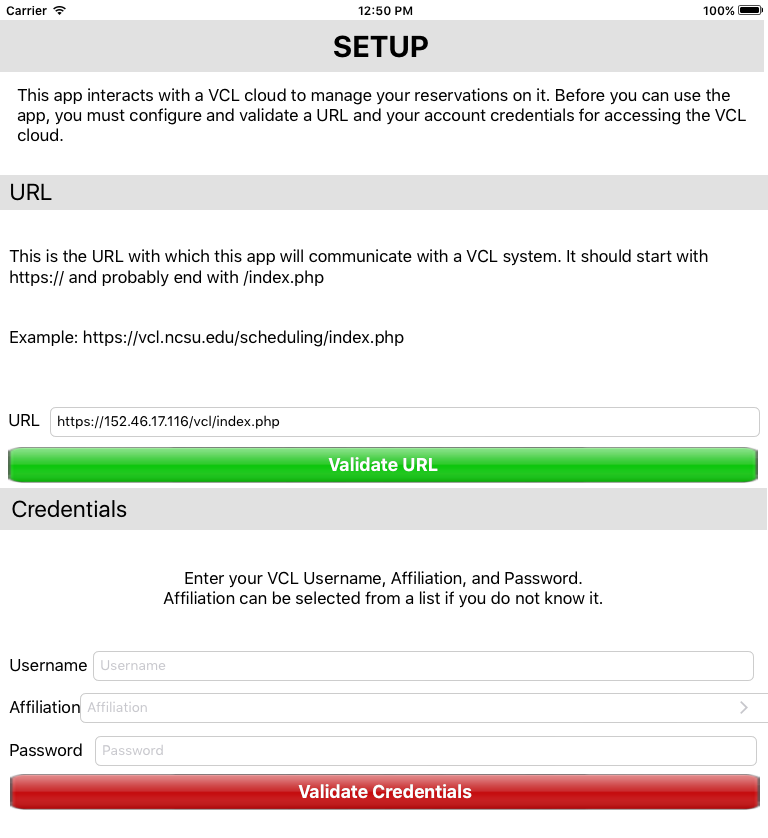
The first step after installing VCL go is to configure it with a URL and user credentials. Any time the app is run without a valid configuration, it displays the Setup screen.
Enter the URL for the VCL system you are using under URL. Enter a URL starting with https:// and ending with either / or index.php. You can use either a hostname or IP address. Here are two examples:
https://152.46.17.116/vcl/index.php
https://vcl.ncsu.edu/scheduling/
The URL most likely is the same one you use to access the VCL system you use, but with anything after index.php removed (i.e. do not include things like ?mode=viewRequests).
After entering the URL, use the Validate URL button to test that connecting to the VCL system works correctly. Contact your VCL system administrator if you have trouble setting the URL. The button will turn from red to green if it works correctly.
Credentials
Enter your VCL username, affiliation, and password. You can tap the arrow on the right side of the affiliation box to get a list of affiliations for the VCL system you are using, and select one from the list.
After entering your credentials, tap the Validate Credentials button to test your credentials. If they are correct, the button will turn green, and the setup screen will slide away. Again, contact your VCL system administrator if you have problems.
Selecting Default Connection Apps
VCL go does not directly connect to VCL reservations, but it can launch 3rd party applications on your iOS device to connect to them. Some 3rd party apps allow the reservation password to be passsed to it, others do not. To assist in using the ones that do not, the reservation password is copied to the clipboard before launching the connection app (unless the environment is configured to use federated credentials, in which case, you’ll need to use your federated account password).
The 3rd party apps used to connect to reservations are selected under the Settings tab.
Tap Linux (SSH) or Windows (RDP) to view a list of supported apps.
Then, tap an app to select it as the one VCL go will use to connect to a reservation of that type.
Getting Started
If you already have VCL reservations, you can view and connect to them by selecting the Reservations tab.
Otherwise, you need to create some Gos.
Creating Gos
First, tap the Gos tab.
To create a Go, tap the + icon at the top right of the list.
You probably want to select the Environment first. Tap Environment to view a list of environments to which you have access. Then, select an environment from the list.
Next, give the Go a name.
Finally, tap Duration to select the duration for this Go. It will display a list of durations. Tap one to select it.
Tap Done to create the Go. This will refresh your list of Gos and display the newly created Go.
Using a Go to Create a Reservation
After creating a Go, you are now ready to use it to create and connect to a reservation.
If you have not already done so, you probably want to set the default connection apps used to connect to reservations. Look under Setup->Selecting Default Connection Apps for instructions on doing so.
Ensure you have the Gos tab selected.
Select a Go from the list. This will display the Go Detail screen.
Tap Create Reservation and Connect to create the reservation. If you have a 3rd party app selected under the Settings tab and have the app installed, the app will be launched when the reservation is ready. If not, information on how to connect to the reservation will be displayed.
Creating reservation:
Password copied to clipboard, 3rd party app about to be launched:
Connection information displayed:
Editing Gos
To edit a Go, tap the Gos tab, and then tap a Go from the list.
Tap Edit in the top right.
Make any changes to the Go, then tap Done to submit your changes.
Managing Reservations
Extending a Reservation
To extend an existing reservation, tap the Reservations tab, and then tap a reservation from the list.
Information about the reservation will be displayed.
Tap Extend Duration to display a list of times for extending the reservation.
Tap a duration to select it. The selected duration will be displayed.
Now, tap Update Duration to extend the reservation by the selected amount. After the content is refreshed, the End time will be updated to reflect the extension.
Ending a Reservation
To end an existing reservation, tap the Reservations tab, and then tap a reservation from the list.
Information about the reservation will be displayed.
Tap End in the top right corner of the display.
Tap End Reservation to end the selected reservation.


